Thứ Tư, 31 tháng 8, 2011

Fashion for kids: Pimp those baby pants!


Fashion for kids: Pimp those baby pants!
Sewing patterns
For the newborn pants shown above you’ll need to cut two rectangles of fabric 4″x7″ each.  For the Big Butt Baby Pants I use that size for the newborn size only. I usually cut 4.5″x8″ for the medium sizes (3-12 months) and 5″x9″ for the larger sizes (18-24 months/2T).  And good grief you can use these pockets for just about anything just by cutting an appropriately-sized rectangle: the length should be roughly twice as long as the width for pockets that are square or nearly square, just remember that you will lose 1/2″ on the width and length for seams. 

Fold your pocket in half lengthwise:
Stitch with a 1/4″ seam around the sides that don’t have folds, leaving a 2″ gap for turning.
Clip the corners of the pocket:
Turn right side out and use a pencil or turning tool to poke out the corners. 
Press the pocket flat.
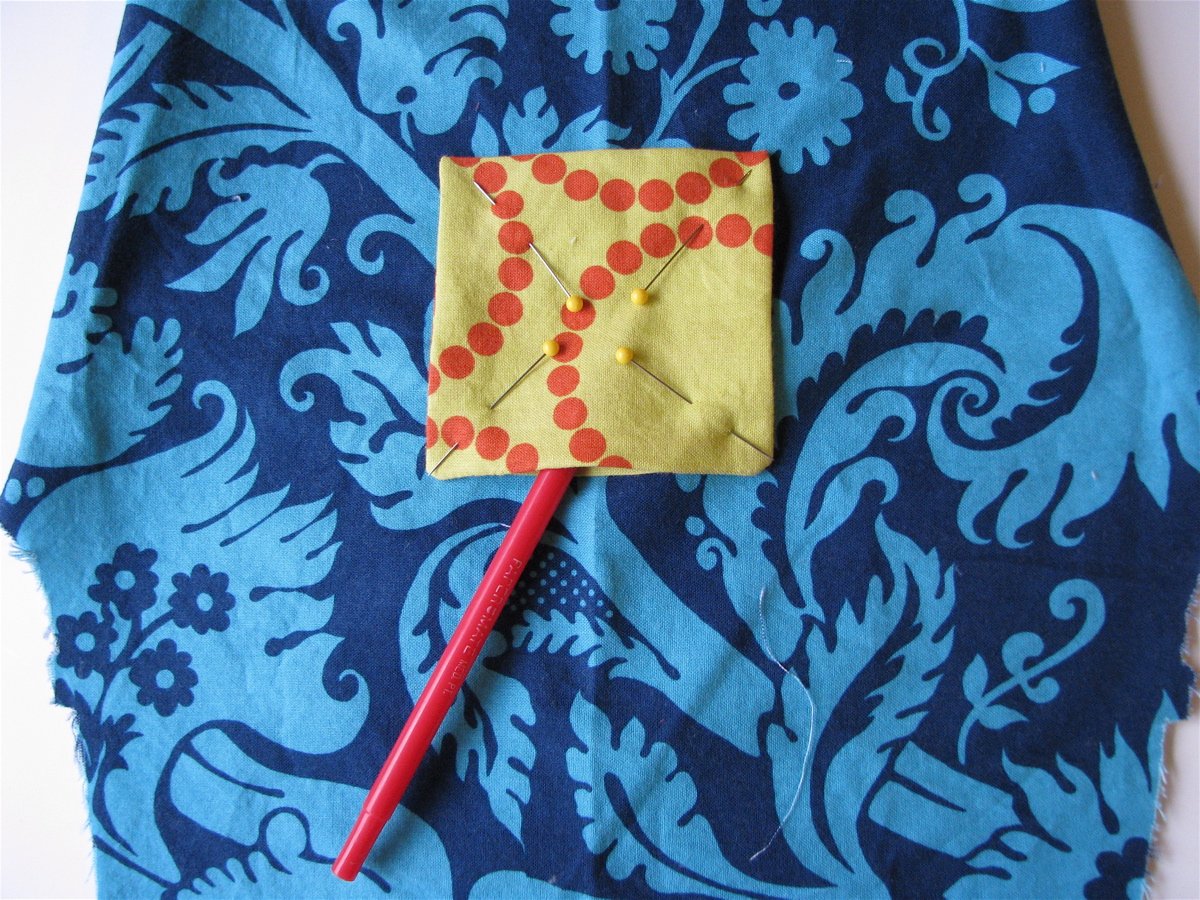
Place the pocket roughly in the center of the pant leg and pin in place.  It’s easiest to do this before you sew any of the pant pieces together.  When I’m making Big Butt Baby pants, I usually slide the pocket slightly toward the front side of the pant (see this picture).
It’s important to make sure that the hole is not at the top of the pocket (see red pen sticking out?).  Since you’ll be sewing three sides of the pocket to the pants, you want to make sure the hole is on one of those three sides.  I prefer to have it on the bottom so that the folded edge of the pocket is on top.  Personally I think that looks neater.
Sew around the pocket on the sides and bottom, backstitching a few times at the beginning and end to make sure it stays put. 
Repeat for the other pocket. Ta-da! Pockets finished.
Now let’s look at how to add a contrast binding to the cuff.
I cut two rectangles of fabric 3″ wide and twice as long as the finished cuff is wide plus one inch (only one is shown above).  When you fold it in half, the folded piece should be 1/2″ wider than the finished cuff. 
Next press the strip in half lengthwise, fold the raw edges into the center crease, and fold/press in half once more.
Starting just before the inner leg seam, pin the binding strip so that one half is inside the pant leg and one half is outside, keeping front and back of the binding as even with each other as possible. The edge of the pant should be all the way down in the binding crease.
When you get back to where you started, fold under the raw edge and pin as shown:
Using a zigzag stitch, sew around the edge of the binding.  The wider your zigzag, the more likely you are to catch both front and back in your stitching.  Repeat for the other leg.
Wocka-wocka, those are some fine lookin’ pants!
 
Source: made-by-rae.com

Craft flower for home: Scalloped Paper Lamp


Craft flower for home:  Scalloped Paper Lamp
(in only 1 hour and 25 minutes)
So, let's get on with the show...

What you need:
a paper lantern
(you can do as many as you like - I embellished 2)

fabric
(I had 4 scraps measuring 27.5 inches x 9 inches each ...
that would come out to be approximately one yard or 1/2 yard per lamp)

fabric glue
(I used Elmer's Craft Bond fabric and paper glue)

scissors
I wanted my individual pieces to be about 2 inches in width so I cut up my fabric accordingly starting with 6 x 9 inch strips.
(I used 2 scraps measuring 27.5 inches x 9 inches for each lantern)

Then, I piled those on top of one another and cut them into more 2 inch strips. I was left over with a one inch strip that I saved in case I needed it.
Then, cut those strips into 2 x 2 inch squares. Now you have this...
(I used approximately 8 minutes to cut)
Then, I took each of those piles, 8 layers in each pile, (the fabric is VERY thin and sheer) and rounded all the edges until they looked like this...
(I used approximately 9 minutes to round all the edges)
Now we are ready to get all those rounded edges to make a scalloped lamp shade!

First, I used a Popsicle stick to apply the fabric glue ... just enough to get that fabric to adhere.

WAIT ... Let's stop for a second. Let's talk placement.
I knew I wanted about a 1/2 inch overlap with all my layers, so I started with placing my first row of pieces with a 1/2 an inch hanging over the bottom edge. This will keep it all consistent.
It also created my little scalloped trim ...
Okay ... push PLAY.
After smearing some glue, I placed each piece overlapping slightly with the piece before it going around the lamp.
(maybe 1/4 of an inch overlap).
Then made sure it was secure.
Then it looked like this ...
Once I was finished with the first row, I started the next row ... in the back of the lantern just in case my rows didn't all match up how I wanted.
Here is where the 1/2 inch overlap going up the lantern will come into play. I made sure that overlap would cover up my glued edges.
Then, I went around the lantern exactly how I did the first row.

Now, just keep going. You will start to see it come together ...
that's when it gets exciting!

Every once in a while my edges wouldn't stay down. When that happened, I just took a little bit of glue and smeared it on top of the aforementioned edges to keep them from curling.
Almost like I would on a Modge Podge project.

Keep gluing, placing and overlapping until you get to the top of your lantern and it looks like this ...
(I used approximately 66 minutes to glue all the pieces on)


Then, I took the pre-sewn hem from the sides of my curtain that I cut off earlier and glued them around the very top of my lantern to finish it off. You could use any trim you would like to finish it off.
Like this ...
(It only took 1 minute and 30 seconds to glue the trim on)
And that's it!
What do YOU think?
I wanted something I would love during the day ...
and illuminated at night ...
Source: dhwilson.blogspot.com

Gift presents for women: Fendi Frill tutorial

yes on the amazing oversized, billowy, ruffled frills adorning the Fall 2010 runway looks at Fendi. We immediately wanted one and just couldn’t imagine having to wait another several months to actually see these frills materialize. With some research, persistence, and umpteen botched attempts, we finally figured out a fail-proofpattern. And obviously, we’re sharing it with you!
 Gift presents for women: Fendi Frill tutorial
Sewing patterns
You’ll need:
- 2 pieces of wool felt
- 2 pin backs
- a few buttons
- a few pins
- a hot glue gun
- a sewing machine
- a pair of fabric shears
- an iron
- our frill pattern

For a fuller and longer frill, print the pattern as it is on 11″ x 17″ paper at 100%. For a smaller frill, reduce the size of the pattern and print on normal 8.5″ x 11″ paper. Carefully cut out the volute-shaped pattern, stack, and pin onto the two pieces of stacked felt. Using the pattern as a guide, cut out the felt. While keeping the two pieces of felt stacked, pull the two pointed ends taut. A ruffle will be created on one side and a straight line on the other. (Click images to enlarge)
Sew the felt together along the straight side, with a 1/4″ inseam, down to the end. Trim any extra threads. Open the frill. Spread the seam apart on the backside and press it open using the tip of a hot iron.
Run a zig zag stitch down the center of the front side of the frill. This will keep the back seam open and flat, giving the frill structure and shape. Glue or sew buttons along the front stitch. Flip the frill over and glue or sew a pin back at the top and another at the bottom.
Your Fendi-inspired frill is finito!
Pin the frill to any blouse, shirt or dress. Make it smaller, make it larger, add less buttons, add more buttons . . . make it to your liking and have fun!
Source: honestlywtf.com

Thứ Ba, 30 tháng 8, 2011

Crafty jewelry: Make Easy Two-Bead Earrings

Crafty jewelry: Make Easy Two-Bead Earrings
 Jewelry making
For the basic version, you'll need:
  • Two pairs of beads: one large, one small

  • Two eyepins, 2 inches long, around 21 gauge (.028 inch)

  • One pair of earwire hooks with open loops

  • Round-nose pliers


 Use special beads that stand out for the larger ones, and simple beads in a coordinating color for the smaller ones.
Start by slipping a large bead onto an eyepin, grab the eyepin more than halfway up (about two-thirds of the way is good), and bend it to a sharp angle.


 Try to hold the eyepin close to the end of the round-nose pliers when bending.
Now slip a small bead on the eyepin and grab the tip of the eyepin with the end of the pliers.


 You're going to bend a loop in the end of the eyepin to match the other end.
This is the way I bend the eye; although I don't think it's the "right" way, it's the best way for me. So do this part whichever way is best for you. Bend the end around in a loop.


 Bend it all the way around until it's touching.
Next, grab the base of the loop and bend it out at a slight angle.


 Bend the loop base the same way it's bent out on the eye of the eyepin.
That will open the loop a bit, so just use the pliers to bend the loop end back in and make it look good.


 Now you have two matching loops on the ends of your eyepin.
To put your beaded eyepin onto the earwire, open up the loop just enough for the eyepin wire to fit.


 This loop will probably be much harder to bend than the eyepin wire.
Slip the eyepin into the earwire loop at the curve.


 When making your second earring, be sure to slip it on the opposite way for symmetrical earrings.
That's it! Repeat all steps for the second earring—I usually do each step for both at the same time so they match best.


 These are so simple, a great design for everyday casual wear.
Version 2

Variation with multiple beads instead of one large bead: You'll need as many beads as you want to use on the larger side, and one pair of beads for the smaller side.

Variation with headpins: You'll need two headpins around 21 gauge instead of the two eyepins.


 This version will make use of more beads.
You'll need to make sure you choose a smaller bead with a hole small enough to stay on the headpin—so a hole smaller than the head. To make each earring, first slip on the smaller bead, then bend less than halfway up, slip on the multiple beads, and bend a loop.


 I chose a fairly large bead to be my smaller-side bead, but this design would work well with a small seed bead, too.
Finish off the same way as the basic version.


 Be sure your bead colors all coordinate well to avoid overly busy earrings.
And here is another similar version but all flipped around. The head end of the headpin is on the larger bead side, which is only one bead, and there are two small beads, with the loop on that end.


 Two small identical beads add a little more interest but don't draw attention away from the larger bead too much.
Version 3

Variation with more crafty earwires: You'll need earwires with long shanks instead of loops and another pair of pliers; flat-nose is best.

Variation with asymmetrical beads on the large sides: You'll need two similar but different large beads, or one large and two smaller that add up to about the size of the large one.


 I chose very simple small beads to keep the earrings from being too complex or busy looking.
Since you are making your own loops for the earwires, you can make them however you want. I made this pair with basic loops but a longish length of wire above the loop. Grab the wire where you want the loop to start and bend the wire to a 90-degree angle. Then bend the end up around the nose of the pliers, all the way around the nose until the loop is completed.


 Place the pliers on the wire depending on how big you want your loop—closer to the end of the nose will make a smaller loop, while farther back will make a larger loop.
Now hold the loop with the pliers and use your second pair of pliers to wrap the wire end around the earwire.


 You can choose to cut the wire when it's wrapped as much as you want.
Squeeze the tip of the wire down so it doesn't stick out. Place a large bead onto an eyepin, bend the eyepin, and put the other end through the earwire loop.


 Your new earwire loop won't open, so you'll have to make the earring in a different order than the other versions.
Place a small bead on the eyepin and make a loop in the end to finish off your earring.


 The three larger beads being the same color helps tie together the earrings even though they are asymmetrical.
Here's another pair with the same variations—these have only one large bead on each earring but they are different yet similar enough to work. These earwire loops were made much higher up, giving more wire to twist around for an interesting earwire look.


 The different shaped beads share the same colors and are about the same size, helping them work together as a pair.
Of course, I encourage you to come up with your own variations—be creative!


 This project is so quick, you could gift a set of multiple pairs if you hurry!


Source: craftstylish.com

Crafty jewelry: Recycled Sweater Wool Jewelry!

allearrings1  
Crafty jewelry: Recycled Sweater Wool Jewelry!
Jewelry making
It’s a simple concept: cut a shape or two or more from a felted wool sweater, attach the pieces to jewelry parts – that’s it!  Well, that’s not really it though, you can make it so much more!
A little background – the yellow hoops were the first thing I made with this idea; when I made my embellished cardigan, I had some yellow ovals left over from the pockets, and I thought, hmm, I could make those into something… I cut the centers out, stuck on some earring wires, and that was that!  Rad!  I played around with the idea a bit further then, making those blue teardrops below, adding some embroidery this time:

yellowhoopearrings blueearrings
Well then I thought, this seems like such a perfect class project – not too many materials or tools needed, super simple concept, but with infinite creative possibility!  I bet students could do all kinds of creative things with the concept, I thought… Well, hoo-boy was I right!  Check it out, these are what four crafters did in my most recent class:
studentsearringsandjack studentsletters
studentsnecklace studentsearrings
I hope they don’t mind me sharing their awesome creations.  I didn’t take photos in any of the previous classes, which I now regret – every single class has had amazing pieces!  Don’t you love that pendant on the bottom?!  I do!  It was made by the library helper at the Sellwood branch, who clearly has fabulous color sense and design talent!
yellow bracelet yellow earrings
I made these pieces as more class examples – a matching set of earrings, fastened together with jumprings, and a bracelet, the pieces stitched together with embroidery floss, to show different ways of joining parts.
yellowset
So for this project, you’ll need:
  • Recycled wool sweater pieces, felted (great for using leftover scraps after making bigger projects from felted sweaters)

  • Scissors

  • Jewelry findings of your choice (depending on what kind of jewelry you’re making)

  • Jewelry pliers

  • Embroidery floss and/or thread (optional, depending on your design) and needle

  • Optional cheap felt and pins for using templates

And the “tutorial” from my class handout…
This project is very free form, not requiring a step-by-step how-to, but the basic steps are:
Cut shapes from felted wool.
Use felt shapes to make jewelry, by either
-stitching pieces together with thread/embroidery floss/yarn
-or joining pieces together with jump rings.
Attach clasps, earring wires, or other finishing parts.
Add embroidery decoration or other optional embellishments.
When stitching parts together, if you want the piece to be able to stretch, use zig zags or diagonal stitches.
Use jewelry pliers to work with jumprings, clasps, and other parts to close them tightly.
Cut any shapes you want, either freehand or using a template (paper or felt).  If you want 2 identical parts, cut 1 first, then pin that one to the second piece to cut it the same.
Of course, I’m there for individual help in the classes, with using pliers, sewing, etc, so I’ve linked to a few how-to sites to help you along with any parts you’re not familiar with.  You can also usemy earring making tutorial on Craftstylish for help with jewelry-making steps.  If you want a book to help, I definitely recommend Susan Beal’s Bead Simple – she’s the one who taught me how to make earrings!
templates
These are craft felt templates I cut for students to use if they want.  If you’re not sure what shape(s) you want, or you want multiple identical shapes, it’s a good idea to play around with some cheap craft felt before cutting into your sweater.  You can try different shapes until you get it just right, then pin the shape onto your sweater and cut around it.
As for felting, this is also on my class handout (see Diane’s felting post on Craftstylish for my detail):
To make recycled wool felt at home, choose a sweater made of 100% wool, or with other animal fibers (like alpaca, angora, cashmere).  Machine wash and dry the sweater on hot or warm settings; this will shrink and “full” the sweater, turning it into felt.  If you want it thicker/denser, wash and dry it again to felt it more.
redearrings4
These are earrings I made during a couple of classes, and probably my favorite ones I’ve made.  Still not nearly as creative or elaborate as some of the students’ creations, but I like the simplicity of them, since they’re pretty big and bright.  (I tried to photograph myself wearing them straight on, so you could see both earrings in the same shot, and this is the best I could get, hah!)
redearrings2 redearrings1
And here are all of my earrings… Obviously, I like making earrings more than other kinds of jewelry, probably because I rarely wear jewelry besides earrings andcuffs.  I had plans to embroider on those dark grey rings, but I think I’m going to leave them alone; again, I like the simplicity…
allearrings1  
Source: leethal.net

Labels

.crochet "o profeta a vida continua a vida e o mar Accessories Acessórios Acessórios crochê acessórios de croché Acessórios Tricô acessórios. aetezabnato afghan AGRADECIMENTO Almofada almofada de alianças almofadas almofadas com croche almofadinha de croché alunos amigas do croche amigas do croché amigas_do_croche amigas-do-croche amigas-docroche amigos Amigurumi amirugumi aniversário aniversáriode filho anjo anjo do dia anjo do dia. anjos anjos com pet anjos d ecroche anjos de crochet anjos de natal anjos em croche apliques em croche arranjo de natal Art arte artes Artes da Melissa artes pláticas artesanato artesanato croche artesanato em croche artesanato em croché artesanato em crochet artesanto artezanato artezanato. artezanato.baby dresscroche artezanatoflores Artezsanato artsanato arvores de garrafa pet et arvores de garrafas pet arvorezinhas de natalanjos de croche Avisos azul baby crochet baby knitting Baby learn bag Bags balloons barradinhos barrado bases couro colares. bases maxi-colares bata crochet bate-mão batinha Bead Bebe e Infantil BEBÊ bebês bebês. belts bichinhosdecroche bijuteria em croché bijuteria em penas bijuterias Biquini em crochê blog em promoção blusa colorida Blusa de crochê blusa irlandesa Blusas blusas crianças blusas de croche blusas de croché blusas de crochet Blusas de verão boinas bolas d enatal com pet boleos bolero circular com gráfico bolero de crochet Bolero de verão Bolero em crochê boleros BOLSA bolsa em croche Bolsas bolsas colridas Bolsas crochê bolsinha d efuxicos books booties bordado bosas clássicas bows boxes bracelet cabides de croche cachecois Cachecois - echarpes cachecois infantis Cachecol cachecol-flores cachorrinho Caetié cake calçasd e crochet. Caminho de mesa candles candy cantinho da mãe Capa de fogão em crochê Capinha com capuz Cards carnaval da Bahia carteira carving carving fruit carving fruits Casaco. Casacos casamento casaquetos Ceará Centro de mesa ceoche chapeu christmas crafts ciclos cirurgia redutora de mamas clay colar de croché colares Colares crochê colares de croché colcha de croché coleção Itaparica. Colete crochê Coletes coletes de croche coloridas e de praia. coloring Comunicados concurso corações Cordão costumização couro Cozinha/crochê crafsts craft crafts crfts criacões livres críticas croch`ê croch~e croche croché croche acessórios. Croche casa croche e fé croche endurecido croche filet croche free croche irlandês croché masculino croche na moda croche russo croche vestuário croche-vestidos crocheirlandês croches crochet crochet coats crochet dress crochet em barbante crochet irlandês crochet jeans crochet pattern crochê crochê endurecido crochê.crochet cronhe em barbante cross stitch cuidados com o verão Curtain Customização cutting paper datas decoração Decoração com Circulo Decoração crochê delicadeza em vestir Descanso de panela desfiles detalhes dia de domingo. dia do amigo dia do artesão Dicas DIV docecrochetar Dolls drawing dress earring Easy dot embalagem de páscoa Embroidery Embroidery - Thêu encharpe encomenda de vestidos de croche encomendas encomendas de croche encomendas de croché encomendas. encontro encontro de crocheteiras encosto pra sofá enfeites d enatal enfeites de parede espera. esquemas para bicos de natal estandarte de maria estolas eva Exposição de arte falando dos amigos família família. Kalhil Gibran fashion Felt feminismo feminista festas filhos fios flor Floral arrangements - Cắm và bó hoa flores flores de croche.e flores df efuxico flores em crochê flower arrangement flowers flowers crochet Folding paper Folding towels food food decor forminhas em eva Funny fuxico gancho. garden garrafas pet gift Gifts girassóis glass gloves Golas Gorros gráficos gráficos de blusas de croche gráficos de boleros gráficos de croches diversos gráficos de crochet gráficos de crochet. gráficos de flores graficos de vestidos gravuras para páscoa. guilandas Hair hair clip hat hats Histerectomia holiday craft holiday crafts home and garden homenagem a meus pais Homenagens iansã idéias Ideias criativas idéias de croche ideias para natal Ilha d eItaparica- mar grande.alegria Ilha de Itaparica Ilha de Itaprica imagens imagens da Ilha de Itaparica inspirações inverno itaparica Itaprica Jaqueta de croche para meninos jeverly jewelery jewelry Jogo americano em crochê Jogo de banheiro Khăn - Mũ kirigami knitting knitting pattern knot lã s elinhas Lei Maria da Penhaassédio moral linha linhas linhas círculo links de enfeites natalinos links de receitas de crochet loja Anjonalua-Ateliê lojinha look lucas luminárias luva macrame Magazine make up making flower making flowers Making flowers - Làm hoa Making toys mamãe mantas de crochet com gráfico mantas para bebês. maxi-colares mensagem meus trabalhos MIMO minha pequena sereia mittens moda Moda Circulo moda croché moda crochet Moda crochê da net com gráficos moda e croche moda e crochet moda em croche moda fashion moda fasion moda incverno Moda kids moda oiutono-inverno moda outono-inverno Moda plus size moda praia moda primavera verão modainverno modfa moldes e gráficos de crochet Mona montando seu casaco deinverno motivos mudar o mundo mulhar Mulher mulher e croche museu da cachaça música.TIim Maia nail Nail art natal natal com reciclagem natal em Itabira natal. necklace necklaces nenem neto ninho-vazio Noticia Circulo o mar or Origami orquídea outubro cor de rosa! painel painting paixão panos d eprato Pantufas pap pap bolero de croches pap crochet. Paper pasarelas páscoa Passadeira passarela da moda passarela da moda. passarelasd a moda Passo a passo passo-a-passo Patchwork patinhos pessoa normal pictures pillow Pillows pintura pinturas plastic plic plas pochos poesia política pon poncho ponto de cruz pontos pontos de crochet Pontos em crochê Porta agulhas Porta copos Porta Treco em crochê prais prece presentes para a mamãe presilhas. primavera princesa kate protesto pela apuração d amorte de Colombiano e Catarina.Justiça Já.Sindicalistas assasinados na bahia.Impunidade. Puxa saco Quilling paper Quilt reaproveitamento de lixo recado par ao meu amor receita. Receitas Receitas crochê e tricô reciclagem reciclagem com grarrafas pet recycle recycling Regatas crochê repair work reportagem retalhos revista Moa ribbon ring rings riscos de natal rosa roupa de menina roupa para meninas roupas roupas coloridas Roupas da Barbie Roupas de croche roupas de crochet Roupas de trico roupas. roupasd e verão rugs saia saia de croché saia longa croche saias saias de croche saias em croche Saídas de praia sais sampa sandalinha de crochet com pap.Caetité são paulo Sapatilha em crochê sapatinhos com gráficos sapatinhos de crochet para bebê scarves sewing shawls shoes and sandals skirt skirts slippers soap socks solidariedade sonho sonhos Sorteios parceria Circulo Sousplat sqaures Squares e motivos em crochê sweater tablecloths Tapeçaria TAPETE Tatting tendências da primavera verão Textil São João têndências da primavera verão Thêu Toalhinha tolhas Top cropped Tops Touca toucas trabalhadora trabalhos de croche Trabalhos em trapilhos trabalhos meus tricot tricô tunicas Tutorial Tutorial video tutorials underwear união Valentine's day Variedades crochê vestido vestido de croche para menia vestido de crochê vestido de menina vestido de noiva em croche vestido em croche vestido irlandês vestido moranguinho crochet Vestidos vestidos de croche vestidos de croché vestidos de crochê vestidos de meninasr vestidos lindos vestidos meninas vestidos para casamentos e madrinhas Video Vídeo aula video tutorial violência contra amulher weaving wedding wood xale de croche xale de filet xale quentinho xale triangular xales